
Introduction: Say Goodbye to Store-Bought Cold Cuts
Have you ever looked at the ingredient list on a package of store-bought deli meat and wondered what half of those additives are? Nitrates, preservatives, artificial flavors these are things you wouldn’t normally put in your food, yet they’re in almost every commercial cold cut.
Now, imagine this: slicing into a fresh, flavorful piece of homemade roast beef or turkey breast, knowing exactly what’s in it. No chemicals, no unnecessary salt—just real, wholesome ingredients. The best part? You control the flavor, texture, and quality.
If you’re tired of overpriced, over-processed deli meats, it’s time to learn how to make homemade cold cuts in your own kitchen. This guide will walk you through everything you need to know from the best cuts of meat to the right cooking techniques, storage tips, and delicious recipes.
Let’s get started!
Table of Contents
Why Choose Homemade Cold Cuts Over Store-Bought?
If you’re still on the fence about making your own deli meats, here are a few compelling reasons why it’s worth the effort:
1. Healthier and Cleaner Ingredients
- No preservatives, artificial nitrates, or unhealthy additives.
- Full control over sodium, fats, and seasonings.
- No hidden sugars or processed fillers.
2. Cost-Effective
- Buying fresh meat in bulk is cheaper than premium store-bought deli cuts.
- A few dollars can yield a week’s worth of high-quality, homemade slices.
3. Customizable to Your Tastes
- Want a smoky roast beef or herb-infused turkey? You can experiment with flavors.
- Adjust the texture by slicing it thin or thick, depending on your preference.
4. Fresher and Tastier
- No sitting on store shelves for weeks.
- You get to enjoy your cold cuts at peak freshness.
Now that you know why homemade cold cuts are the superior choice, let’s go over what you’ll need.
Essential Equipment and Ingredients for Homemade Cold Cuts
Must-Have Equipment
| Tool | Purpose |
|---|---|
| Meat slicer or sharp knife | To get thin, uniform slices |
| Roasting pan | Ideal for slow-roasting meats |
| Meat thermometer | Ensures perfect cooking temperature |
| Cheesecloth | Helps shape and bind meats during cooking |
| Blender/Food processor | Useful for emulsified meats like homemade bologna |
Common Ingredients for Homemade Cold Cuts
| Ingredient | Purpose |
|---|---|
| Fresh meat (chicken, turkey, beef, pork) | The base for your cold cuts |
| Salt & curing agents | Helps enhance flavor and texture |
| Herbs & spices | Adds variety to taste |
| Natural binders (eggs, gelatin) | Keeps some deli meats firm |
Now that you’ve got the tools and ingredients, let’s dive into how to make homemade cold cuts step by step.
Step-by-Step Guide to Making Homemade Cold Cuts
Making your own deli-style cold cuts at home may seem intimidating at first, but once you understand the process, it becomes second nature. Follow these steps to ensure your cold cuts turn out perfectly tender, flavorful, and easy to slice.
Step 1: Choosing the Right Meat
The quality and type of meat you choose play a significant role in the taste and texture of your homemade cold cuts. Some cuts work better than others, depending on the type of deli meat you’re trying to replicate.
Here’s a breakdown of the best cuts for different types of cold cuts:
| Type of Cold Cut | Best Cuts of Meat | Texture & Flavor Profile |
|---|---|---|
| Turkey Cold Cuts | Turkey breast | Lean, mild flavor, firm texture |
| Chicken Cold Cuts | Chicken breast or thigh | Juicier than turkey, mild and adaptable |
| Roast Beef Cold Cuts | Top round, sirloin, or eye of round | Tender, deep flavor, slightly chewy |
| Pork Cold Cuts (Ham) | Pork loin or shoulder | Rich, slightly fatty, juicy |
| Smoked Cold Cuts | Any of the above cuts | Adds deep, smoky flavor |
Pro Tip:
- Opt for boneless, skinless cuts for easier preparation and slicing.
- Choose grass-fed or organic meats for a cleaner taste and better nutritional value.
Step 2: Preparing the Meat
Once you’ve chosen your meat, the next step is preparation. This is where you can infuse flavors, tenderize the meat, and ensure a perfect final product.
2.1 Trimming and Cleaning
- Remove excess fat and connective tissue for a leaner final product.
- If using poultry, remove the skin for a more uniform texture.
2.2 Seasoning and Marinating
This is where the magic happens! Seasoning your meat properly will make your cold cuts stand out.
Basic Seasoning Mix:
- Salt & Black Pepper – Enhances the meat’s natural flavor.
- Garlic Powder & Onion Powder – Adds depth and aroma.
- Paprika or Smoked Paprika – Provides a subtle smokiness.
- Herbs (Thyme, Rosemary, Oregano) – Infuses earthy and fresh notes.
Marinating Instructions:
- Rub the meat thoroughly with the seasoning blend.
- Place the meat in a ziplock bag or airtight container and refrigerate for at least 12 hours (overnight is best).
- If using a wet marinade, consider adding olive oil, lemon juice, Worcestershire sauce, or Dijon mustard for added moisture and flavor.
Pro Tip:
- For a more intense flavor, let the meat marinate for 24 hours.
- If making ham-style pork cold cuts, consider curing the meat with a brine solution (salt, sugar, and water) for a few days.
Step 3: Cooking Methods
Now comes the most crucial step cooking the meat. The goal is to cook it gently and evenly, preserving moisture while developing the best texture for slicing.
There are three primary methods to cook homemade cold cuts:
3.1 Roasting Method (Best for Turkey, Chicken & Beef Cold Cuts)
Ideal for: Roast turkey, roast beef, chicken breast cold cuts.
- Preheat oven to 275°F (135°C) for slow roasting.
- Place the marinated meat on a roasting rack (for even airflow).
- Insert a meat thermometer into the thickest part of the meat.
- Roast until the internal temperature reaches:
- Chicken/Turkey: 160°F (71°C)
- Beef (Medium-Rare): 135°F (57°C)
- Remove from the oven, tent with foil, and let it rest for 20 minutes before refrigerating.
Why This Works: Slow roasting at a low temperature keeps the meat juicy and prevents it from drying out.
3.2 Poaching Method (For Smooth, Moist Cold Cuts Like Bologna & Ham)
Ideal for: Pork loin, chicken breast, or emulsified meats.
- Wrap the seasoned meat in cheesecloth and tie it securely.
- Submerge in a pot of simmering water (not boiling) at 160-170°F (71-77°C).
- Cook gently for 1-2 hours, depending on the thickness of the cut.
- Let the meat cool in the water before refrigerating.
Why This Works: This method ensures moist, evenly cooked meat without the risk of overcooking.
3.3 Smoking Method (For an Authentic Deli-Style Flavor)
Ideal for: Smoked turkey, pastrami, smoked beef, or pork cold cuts.
- Preheat smoker to 225°F (107°C).
- Use mild wood chips (applewood, cherry, or hickory) for flavor.
- Place the meat in the smoker and cook low and slow until the internal temp reaches:
- Turkey/Chicken: 160°F (71°C)
- Beef/Pork: 140°F (60°C)
- Let the meat rest and cool completely before slicing.
Why This Works: Smoking infuses the meat with deep, rich flavors and creates a beautiful crust.
Step 4: Cooling and Slicing
Once your meat is fully cooked, it needs to cool properly before slicing.
Cooling Process:
- Let the meat rest at room temperature for about 30 minutes.
- Wrap it tightly in plastic wrap or foil and refrigerate for at least 4 hours (or overnight) before slicing.
Why Chill First?
Slicing warm meat will result in uneven, shredded pieces. Chilling firms up the texture, making it easier to get thin, uniform slices.
Slicing Techniques:
- Use a sharp chef’s knife or a meat slicer for precise, deli-style slices.
- For super-thin slices, use a serrated knife and cut against the grain.
- Store slices layered between parchment paper to prevent sticking.
Step 5: Storing Your Homemade Cold Cuts
Proper storage is key to keeping your homemade deli meat fresh and safe to eat.
Refrigeration:
- Store cold cuts in an airtight container.
- Keep in the fridge for up to 5 days.
Freezing:
- Layer slices between parchment paper and place in a ziplock bag.
- Store in the freezer for up to 3 months.
- To thaw, place in the fridge overnight—avoid microwaving to maintain texture.
Step 6: Enjoying Your Homemade Cold Cuts
Now that you’ve perfected your homemade cold cuts, it’s time to enjoy them!
Ways to Use Your Homemade Cold Cuts:
- Make a classic deli sandwich with fresh bread, mustard, and cheese.
- Add slices to a charcuterie board with crackers, cheese, and olives.
- Use in wraps, paninis, or salads for a protein boost.
- Dice and toss into omelets, pasta dishes, or casseroles.
Best Homemade Cold Cut Recipes
Nothing beats the taste of fresh, homemade cold cuts crafted with real ingredients and seasoned to perfection. Whether you prefer turkey, chicken, beef, or pork, you can create deli-style meats that are not only healthier but also more flavorful than store-bought options.
Below, you’ll find detailed, foolproof recipes for the best homemade cold cuts, complete with ingredient lists, step-by-step instructions, and variations to customize the flavors to your liking.
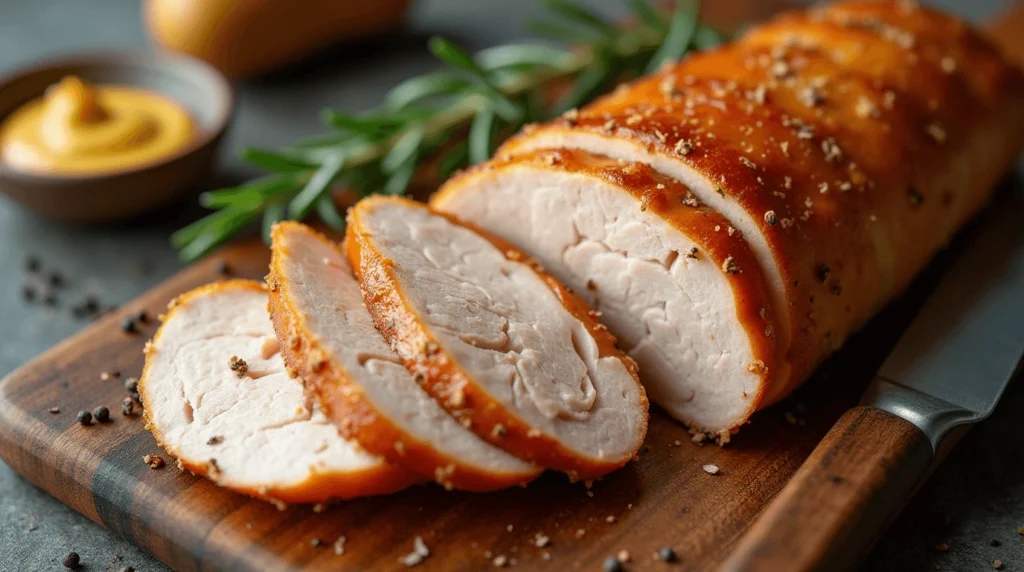
1. Homemade Roast Turkey Cold Cuts
This homemade turkey cold cut is juicy, flavorful, and perfect for sandwiches. Roasting at a low temperature ensures a tender texture, while a simple spice rub enhances the natural flavors.
Ingredients:
| Ingredient | Quantity |
|---|---|
| Turkey breast (boneless, skinless) | 2 lbs |
| Olive oil | 2 tbsp |
| Garlic powder | 1 tsp |
| Black pepper | ½ tsp |
| Paprika (smoked or regular) | 1 tsp |
| Salt | 1 tsp |
| Dried thyme (or rosemary) | ½ tsp |
| Lemon juice | 1 tbsp |
Instructions:
- Preheat the oven to 275°F (135°C).
- In a small bowl, mix olive oil, garlic powder, black pepper, paprika, salt, thyme, and lemon juice to form a paste.
- Rub the mixture all over the turkey breast, ensuring it’s evenly coated.
- Place the turkey on a roasting rack and bake for 1.5 to 2 hours or until the internal temperature reaches 160°F (71°C).
- Remove from the oven, cover loosely with foil, and let it rest for 20 minutes before refrigerating.
- Chill for at least 4 hours, then slice thinly and enjoy!
Flavor Variations:
- Herb-Crusted: Add fresh chopped parsley, basil, and oregano to the rub.
- Smoky Turkey: Add ½ teaspoon liquid smoke to the marinade for a richer taste.
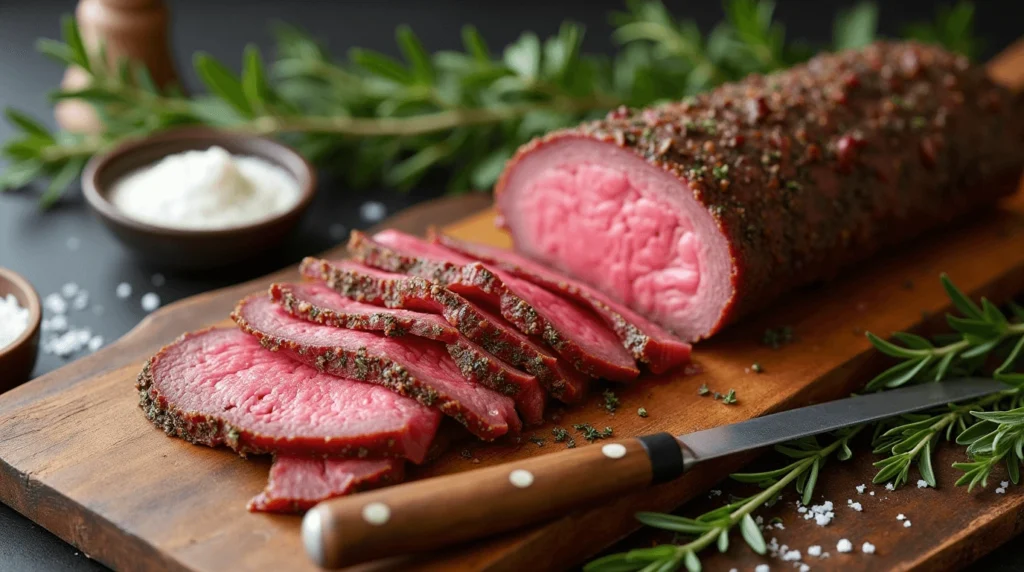
2. Classic Homemade Roast Beef Cold Cuts
Nothing beats tender, thinly sliced roast beef for sandwiches, wraps, and charcuterie boards. This recipe gives you that rich deli-style beef, slow-roasted for maximum tenderness.
Ingredients:
| Ingredient | Quantity |
|---|---|
| Beef round (or top sirloin) | 2 lbs |
| Worcestershire sauce | 2 tbsp |
| Garlic, minced | 2 cloves |
| Black pepper | 1 tsp |
| Salt | 1 tsp |
| Olive oil | 2 tbsp |
| Dijon mustard | 1 tbsp |
| Onion powder | ½ tsp |
| Smoked paprika | ½ tsp |
Instructions:
- Marinate the beef by mixing Worcestershire sauce, garlic, black pepper, salt, olive oil, mustard, onion powder, and paprika. Rub this mixture all over the beef.
- Cover and refrigerate overnight for maximum flavor.
- Preheat oven to 275°F (135°C).
- Place the beef on a roasting rack and roast until the internal temperature reaches:
- 135°F (57°C) for medium-rare
- 145°F (63°C) for medium
- Remove from the oven, wrap in foil, and let it rest for 30 minutes before refrigerating.
- Once chilled, slice thinly for sandwiches or wraps.
Flavor Variations:
- Garlic Butter Roast Beef: Brush the beef with melted garlic butter before roasting.
- Pepper-Crusted: Coat the roast in cracked black pepper and sea salt before cooking.
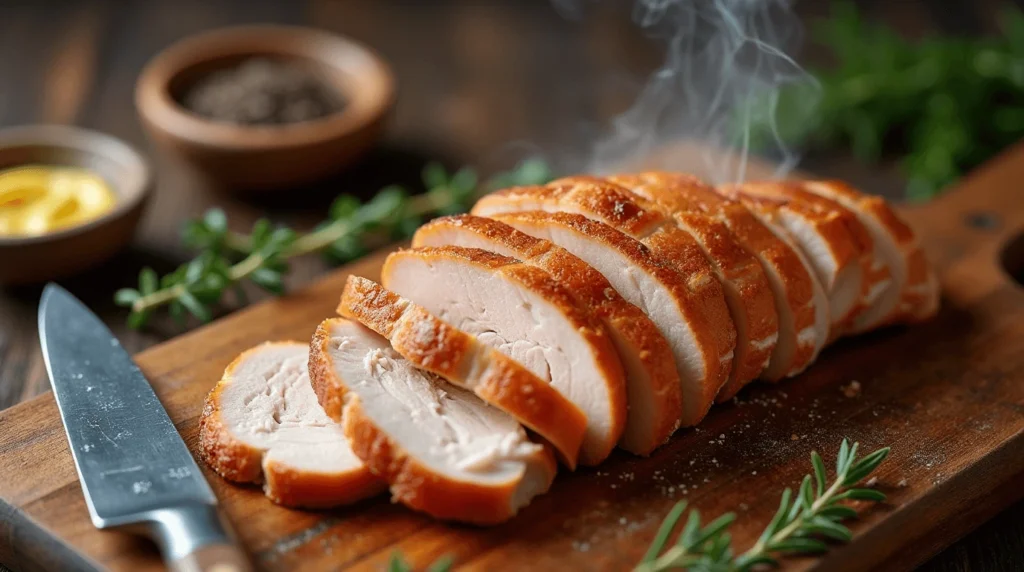
3. Homemade Smoked Chicken Cold Cuts
Smoked chicken cold cuts bring a deep wood-fired flavor that pairs well with sandwiches, salads, and wraps.
Ingredients:
| Ingredient | Quantity |
|---|---|
| Chicken breast | 2 lbs |
| Olive oil | 2 tbsp |
| Smoked paprika | 1 tsp |
| Black pepper | ½ tsp |
| Garlic powder | 1 tsp |
| Salt | 1 tsp |
| Apple cider vinegar | 1 tbsp |
Instructions:
- Preheat the smoker to 225°F (107°C).
- Mix olive oil, smoked paprika, black pepper, garlic powder, salt, and vinegar. Rub the mixture all over the chicken.
- Place chicken in the smoker and cook for 3–4 hours or until the internal temp reaches 165°F (74°C).
- Remove from smoker, let rest, and refrigerate before slicing.
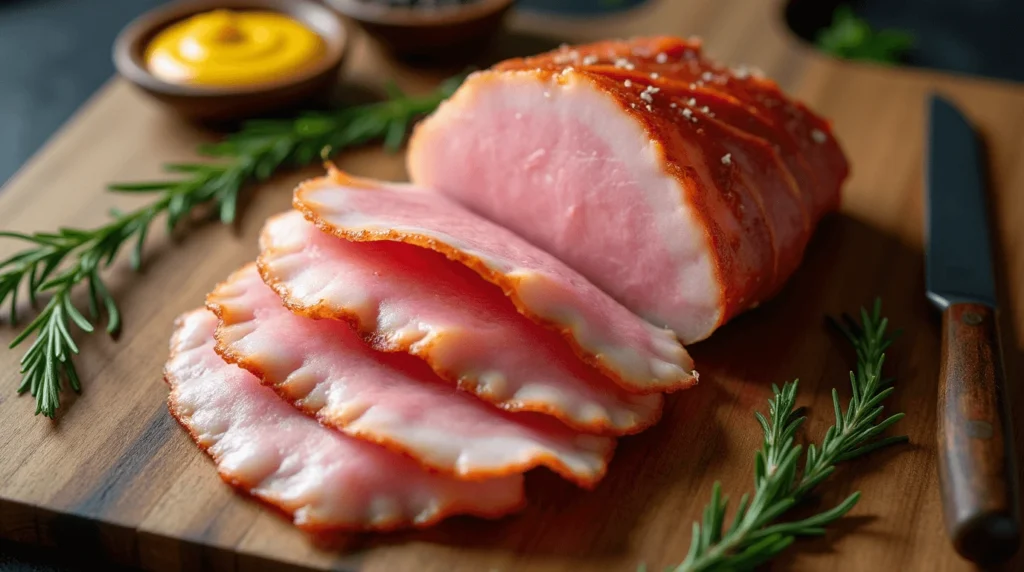
4. Homemade Ham-Style Pork Cold Cuts
This recipe mimics the savory, slightly sweet flavor of deli ham but without the additives.
Ingredients:
| Ingredient | Quantity |
|---|---|
| Pork loin (boneless) | 2 lbs |
| Honey | 2 tbsp |
| Mustard | 1 tbsp |
| Apple cider vinegar | 1 tbsp |
| Garlic powder | 1 tsp |
| Black pepper | ½ tsp |
| Salt | 1 tsp |
Instructions:
- Mix honey, mustard, vinegar, garlic powder, black pepper, and salt. Rub over pork loin.
- Let marinate for at least 4 hours (preferably overnight).
- Preheat oven to 300°F (150°C). Roast for 2–3 hours or until the internal temperature reaches 145°F (63°C).
- Let cool, refrigerate, and slice thinly.
Storage and Shelf Life of Homemade Cold Cuts
- Refrigeration: Store in an airtight container for 3–5 days.
- Freezing: Slice and freeze with parchment paper between layers for up to 3 months.
Pro Tips for Perfect Homemade Cold Cuts
- Slice when cold for uniform, thin cuts.
- Experiment with different spice blends for unique flavors.
- Rest the meat after cooking to lock in juices.
Frequently Asked Questions (FAQ) About Homemade Cold Cuts
How long do homemade cold cuts last in the fridge?
Homemade deli meats last 3–5 days when stored properly.
Can I freeze homemade cold cuts?
Yes! Wrap in parchment paper and store for up to 3 months.
Are homemade cold cuts healthier than store-bought?
Absolutely! No preservatives, lower sodium, and fully customizable ingredients.
Do I need a meat slicer?
Not necessarily—a sharp knife will do the trick.
Conclusion: Elevate Your Sandwiches with Homemade Cold Cuts!
Now that you know how easy it is to make your own homemade cold cuts, it’s time to give it a try! Whether you prefer roast turkey, beef, or even smoked deli meats, you’ll never go back to store-bought again.
Start today and enjoy healthier, tastier, and budget-friendly deli meat made right in your own kitchen.
What’s your favorite homemade deli meat recipe? Let us know in the comments below!